
The Ultimate Fix for the Not Registered on Class Glitch in Windows
Fix Slow Network Issues with These Simple DNS Flush Steps for Windows Users
How to flush DNS on Windows 10 and Windows 11
How to flush DNS on Windows 10 and Windows 11 ](https://store.revouninstaller.com/order/checkout.php?PRODS=28010250&QTY=1&AFFILIATE=108875&CART=1 )
In some cases when you have trouble connecting to the internet the reason behind it can be your PC’s DNS cache. If you have already tried toclear your browser cache and cookies , you will have to flush your Windows 10 or Windows 11 DNS. In this article, we will discover how to flush DNS on your Windows PC.
First let’s discover what the Windows DNS cache does
DNS stands for Domain Network System. The main role of the DNS is to translate familiar domain names like revouninstaller.com into IP addresses computers use to connect with each other. For example, if you want to connect to google.com, your computer queries a DNS server on the internet to get the corresponding IP address connected to the google.com domain. Windows 10 and Windows 11 store a copy of the information it gets from the DNS server on your PC, so the process can be faster.
When will you have to flush your DNS cache
Most of the systems connected to the internet automatically update the cache and hostnames, you can have problems when the IP address of a webpage changes before the update. If that is the case you can have connectivity issues, with the page failing to load in your browser. When you flush your DNS all the stored information on your PC is removed. This forces your computer to retrieve new data that will solve your connectivity issues.
So how can you flush your DNS on your Windows 10 or Windows 11 PC?
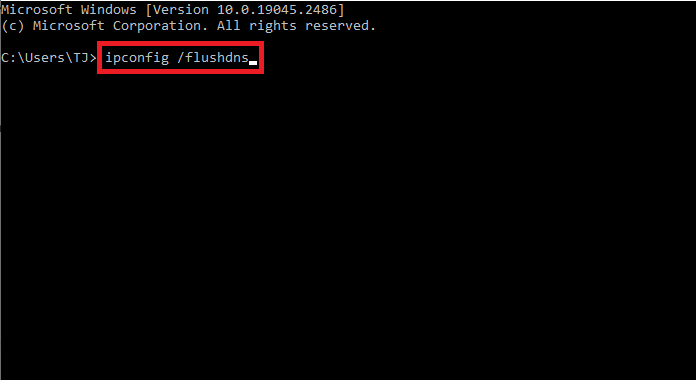
Using Command Prompt
- Open the Start Menu and in the search bar type
cmdand selectRun as Administrator . - Copy and paste the following command:
ipconfig /flushdnsand pressEnter .
- Open the Start Menu and in the search bar type
Your Windows 10 or Windows 11 DNS cache should be flushed. You will get a message saying the operation is successful.
Another way to flush your Windows DNS is by using PowerShell. Here is how to do it:
- Open the Start Menu. In the Search bar type
PowerShelland clickRun as administrator . - Copy and paste the following command:
ipconfig /flushdnsand pressEnter . This will clear the DNS cache on your computer.
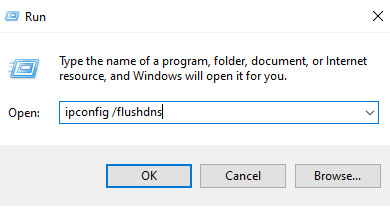
Using a Run Command

- PressWin Key + R and type the following command:
ipconfig /flushdnsand hitEnter .
- Your DNS cache should be erased from your Windows 10 or Windows 11 computer.
Flushing the DNS cache may seem like a lot of technical jargon, but it’s a simple process, as you now know.
In Windows 10 and Windows 11, there are several ways to flush the DNS cache, including using the Command Prompt, PowerShell, and the Run command.
So, go ahead and flush your Windows 11 computer’s cached DNS data to resolve any underlying connectivity issues and improve your privacy.
![]()
We can help you every time when…
- you cannot find the program in the Apps & Features list
- the program’s built-in uninstaller is non-functional
- you have a lot of leftovers slowing down your computer’s performance
- you want to batch uninstall
- many more things
Download now
Also read:
- [New] 2024 Approved From Concept to Capture The Breakdown of Apeak's Recorder Software
- Battle with a Crashy Windows Explorer? Try These 7 Tactics
- Beyond Default Options: Evaluating the Need for a Third-Party App to Remove Programs
- Clearing Storage on Your PC: Efficient Ways to Reclaim Disk Space with Windows 11
- Fixes for Apps Keep Crashing on Oppo Find N3 | Dr.fone
- In 2024, How to Unlock Honor X50 GT Phone with Broken Screen
- Live Feed Capture via OBS for Instagram for 2024
- Masterclass in Overcoming DirectX's Most Challenging Errors
- Mastering Digital Interaction on Popular Platforms Like Facebook, Twitter, Instagram, Youtube.
- Title: The Ultimate Fix for the Not Registered on Class Glitch in Windows
- Author: Michael
- Created at : 2024-12-08 22:44:56
- Updated at : 2024-12-15 23:59:15
- Link: https://win-forum.techidaily.com/the-ultimate-fix-for-the-not-registered-on-class-glitch-in-windows/
- License: This work is licensed under CC BY-NC-SA 4.0.