
Step-by-Step Tutorial: Troubleshooting & Solving Secure Internet Connectivity Problems on Windows PCs

Step-by-Step Tutorial: Troubleshooting & Solving Secure Internet Connectivity Problems on Windows PCs
Quick Links
- Why Does Windows Display the “No Internet, Secured” Message?
- Try These Things First
- Restart the Network Setup Service
- Update the Network Driver
- Enable All the Important Network Settings
- Reset the Network Settings
Key Takeaways
- The message “No Internet, Secured” usually appears when your connection is weak. You can reboot your router to refresh your network, which might also improve its speed.
- Alternatively, you can also restart the Network Setup Service to potentially fix the problem.
- If rebooting the router or restarting the Network Setup Service doesn’t help, you should try other fixes like updating your network driver, disabling your VPN, enabling all network-related settings, or resetting your network settings.
It’s very easy to connect to the internet on your Windows computer. However, Windows may sometimes display the message, “No Internet, Secured,” when you try to connect to a network. What exactly does this message mean, and how can you fix it? Here’s everything you need to know.
Why Does Windows Display the “No Internet, Secured” Message?
The “No Internet, Secured” message is a common network-related issue that can occur on both Windows 10 and Windows 11. You will usually see this message when trying to connect to a network that’s currently down or has a weak signal. However, it can also appear even when connecting to a strong, active network.
In these cases, the message indicates a deeper problem with your computer’s network settings. It’s possible that your network driver is corrupted, or a critical service needed to connect to the internet isn’t running properly.
Regardless of what’s triggering this message, we’ll help you resolve it and reconnect to the Internet. Here are all the solutions you can try to get rid of the “No Internet, Secured” message on your Windows computer.
Try These Things First
Before you delve into advanced fixes, there are a few things you should try beforehand. First, you should try connecting another device to the network that is displaying the message. This will help you determine if the issue is with that network or your computer.
If the other device can also not connect to that network, it suggests that the problem lies with the network rather than your computer. In this case, you should try restarting your router if the issue is related to your Wi-Fi connection. If the problem occurs when connecting to a mobile hotspot network, you should toggle the airplane mode on and off on your smartphone.
Additionally, you should ensure that you are not connected through any VPN client on your computer or smartphone if trying to connect to a hotspot network. This is because connecting to a VPN can bog down the network, which is often the root cause of the message you are seeing.
Restart the Network Setup Service
If another device was able to connect to the network that you’re having trouble with on your computer, then it indicates that there is an issue within your Windows computer. It is most likely that the Network Setup Service, which helps your computer connect to the network, is having problems running on your computer or is not configured to run automatically.
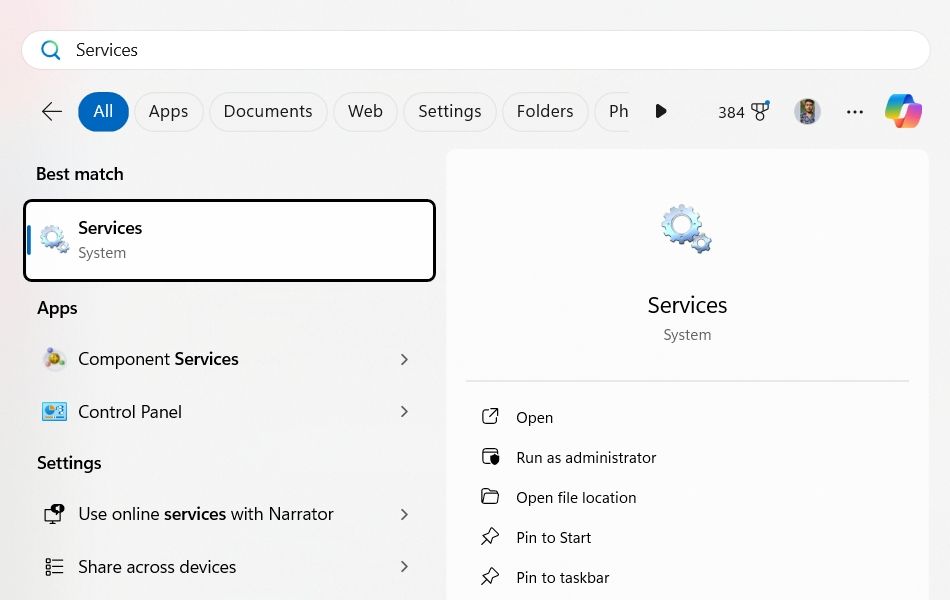
You’ll have to check this service and ensure it is running to fix the issue. To do this, open the Start menu, type Services in the search bar, and hit Enter.
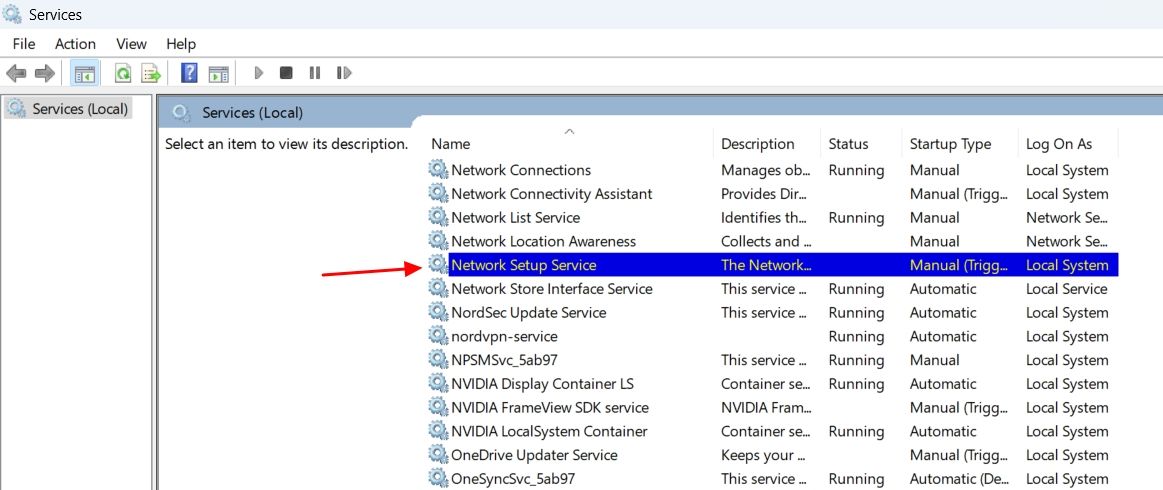
In the Services window, locate and select “Network Setup Service.”
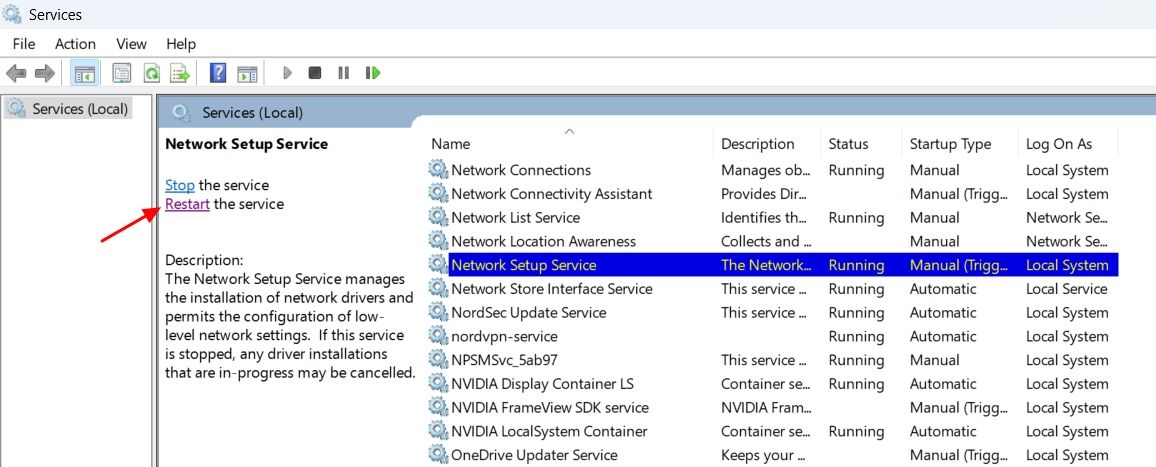
If you get the option to restart the service, it means that the service is running on your computer but doesn’t guarantee that it is functioning properly. In this case, you can click the “Restart” option to restart the service, which will most likely fix the issue that was stopping it from functioning properly.
If you only see the Start option, then it means that the service is not running on your computer, and it is probably the only reason why you’re encountering the “No Internet, Secured” message.
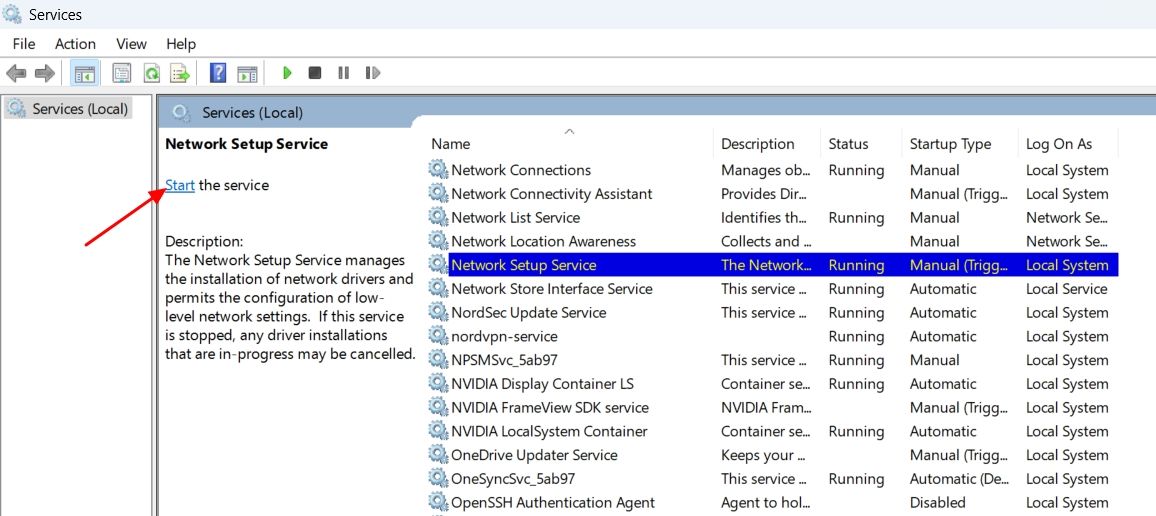
In this case, double-click “Network Setup Service,” change its Startup type to “Automatic,” and then click the “Start” button.
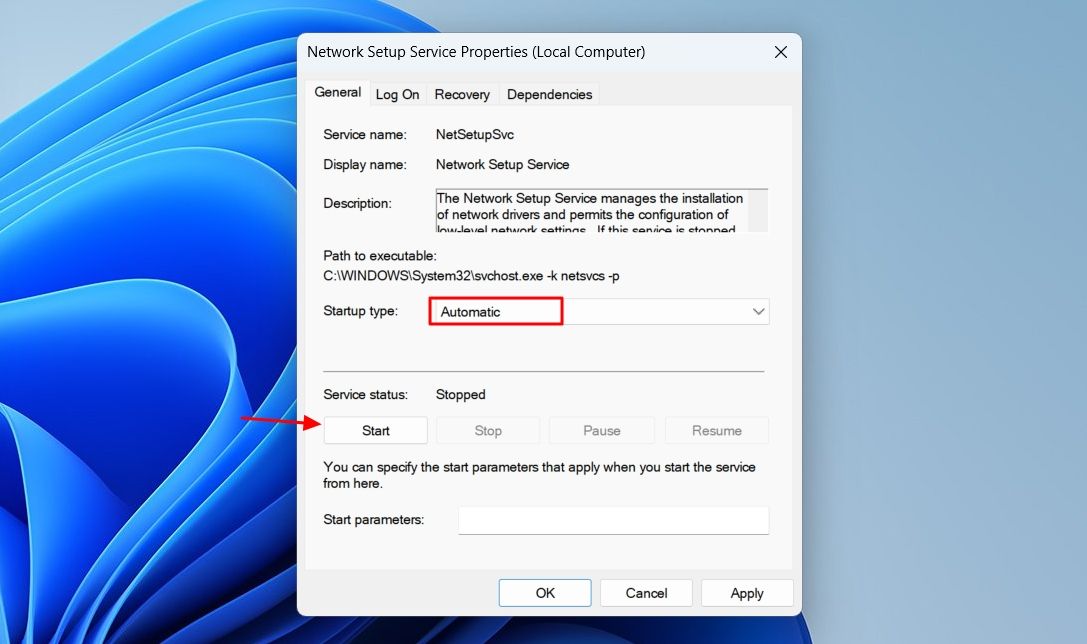
Click “Apply” and “OK” to save the changes. After that, restart your computer and then check for the problem.
Update the Network Driver
If you’ve started seeing the message after upgrading or updating Windows , it’s possible that your current network driver is not compatible with the new Windows version. In this case, you will have to update the network driver to fix the issue. To do this on Windows 11, open the Settings menu and navigate to Windows Update > Advanced Options > Optional Updates.
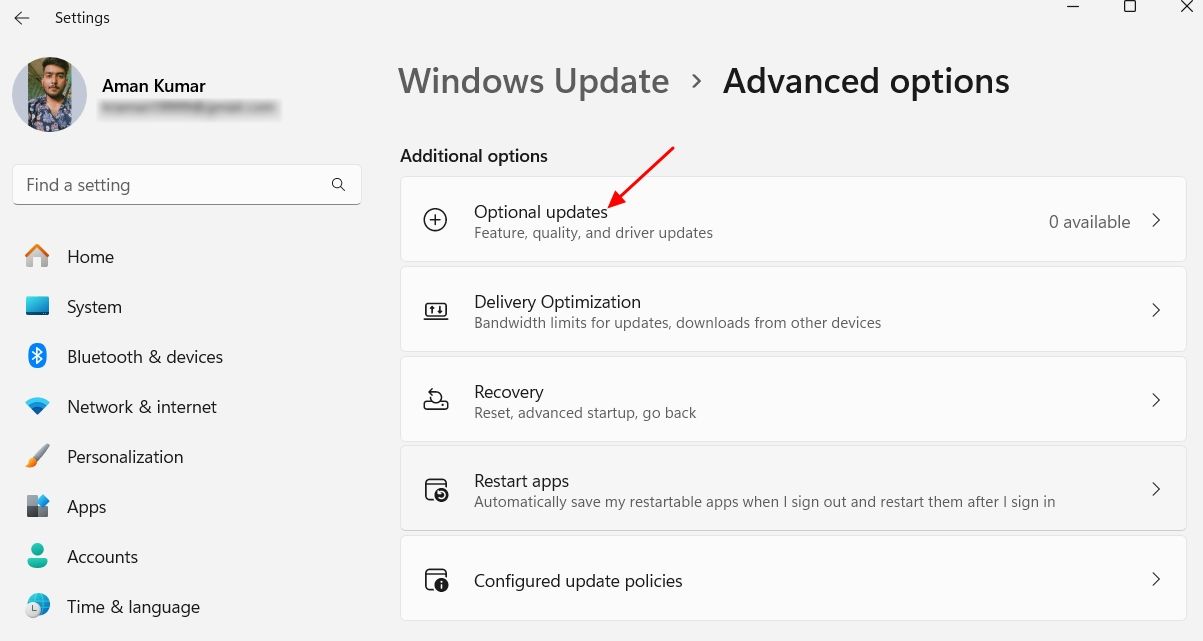
In the Optional updates window, you will see updates available for all the drivers installed on your computer, including the network driver. Simply install the update available for your network driver to fix the problem.
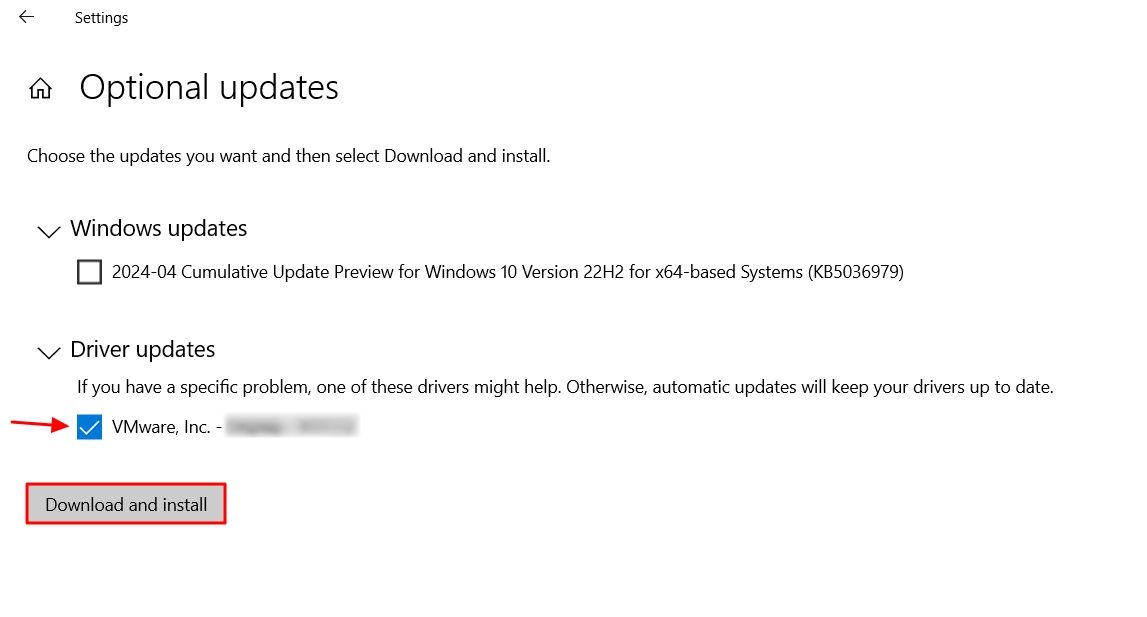
On Windows 10, open the Settings menu, and head towards Update & Security > Windows Update > View All Optional Updates > Driver Updates.
Check the box for the network driver update, and click the “Download and Install” button.
Alternatively, you can visit your PC manufacturer’s website to download the latest network driver update. The update that you will download from there will be a “.exe” file, so you can simply install it like any other application on your computer.
Once you have installed the network driver update, restart your computer and then try connecting to the network again.
Enable All the Important Network Settings
Your network adapter has many network-related settings that must be enabled if you want to connect to the network. If any of these settings are disabled, you will not be able to connect to the internet and may see the “No Internet, Secured” message. To check and enable all these network settings, open the Start menu, type Control Panel in the search bar, and press Enter.
In the Control Panel , navigate to Network and Internet > Network and Sharing Center > Change Adapter Settings.
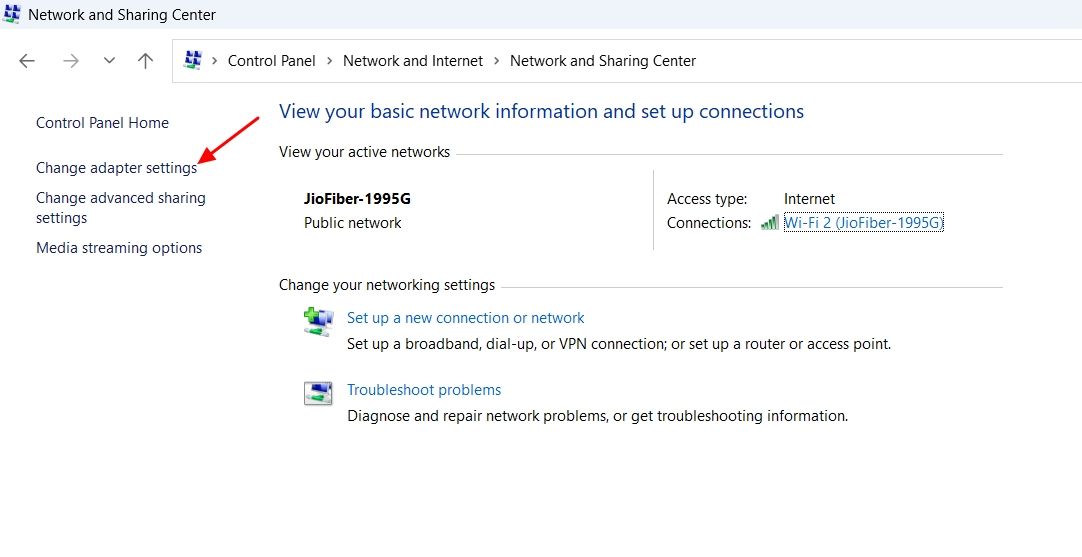
Double-click the Wi-Fi adapter and select “Properties.”
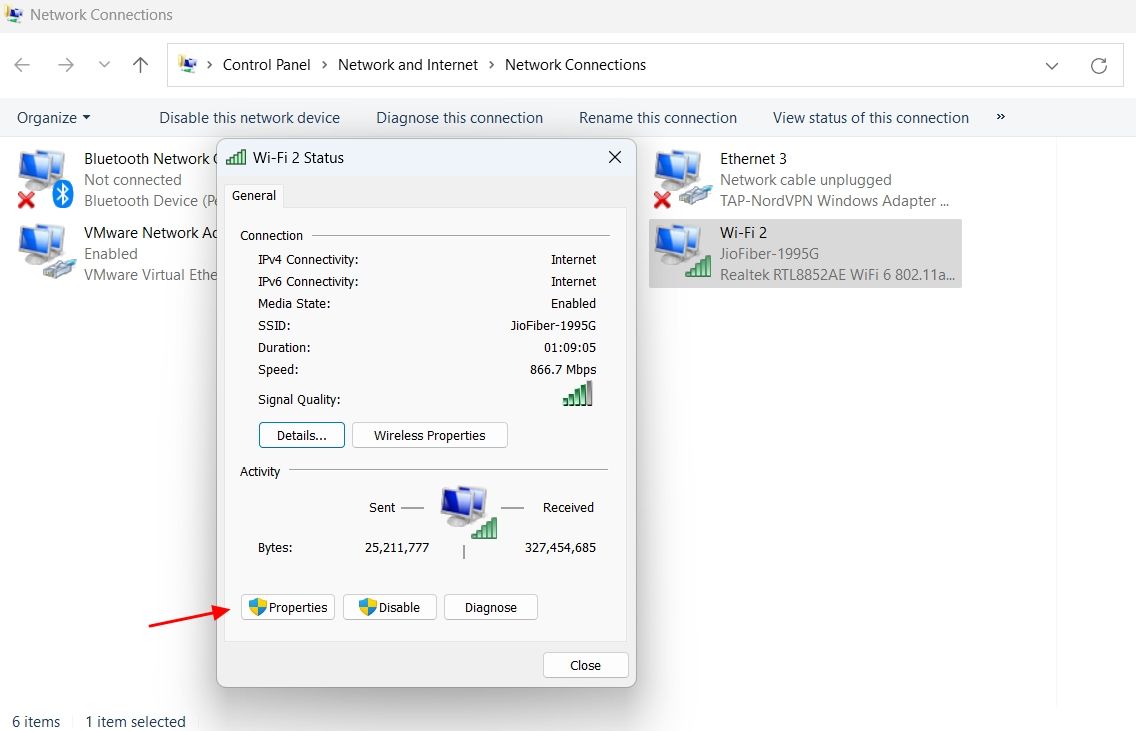
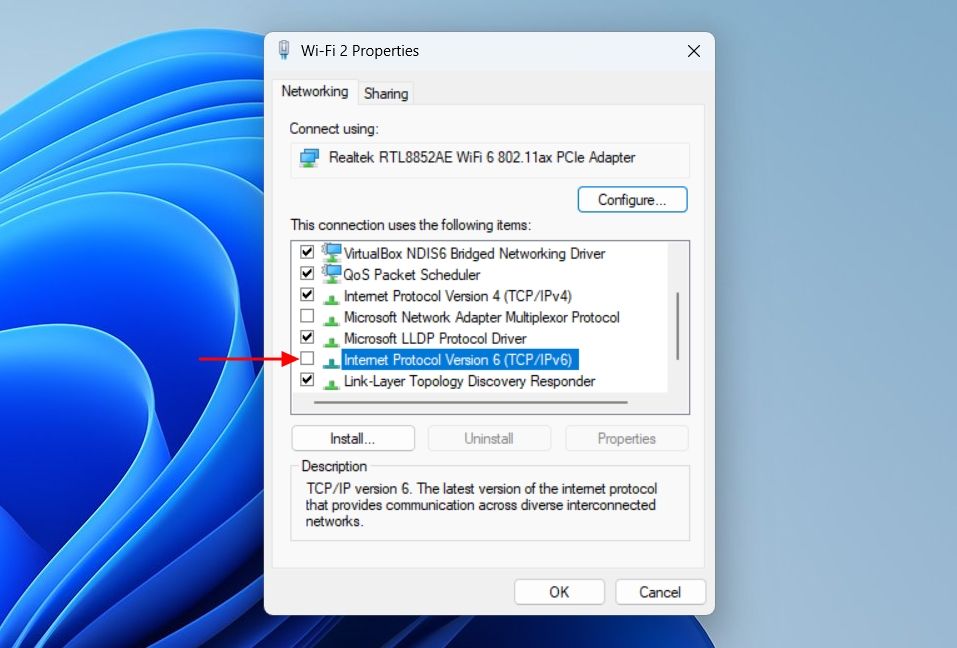
In the Properties window, ensure the following items are checked:
- Client for Microsoft Networks
- File and Printer Sharing for Microsoft Networks
- QoS Packet Scheduler
- Internet Protocol Version 4 (TCP/IPv4)
- Microsoft LLDP Protocol Driver
- Link-Layer Topology Discovery Responder
- Link-Layer Topology Discovery Mapper I/O Driver
Uncheck the “Internet Protocol Version 6 (TCP/IPv6)” box.
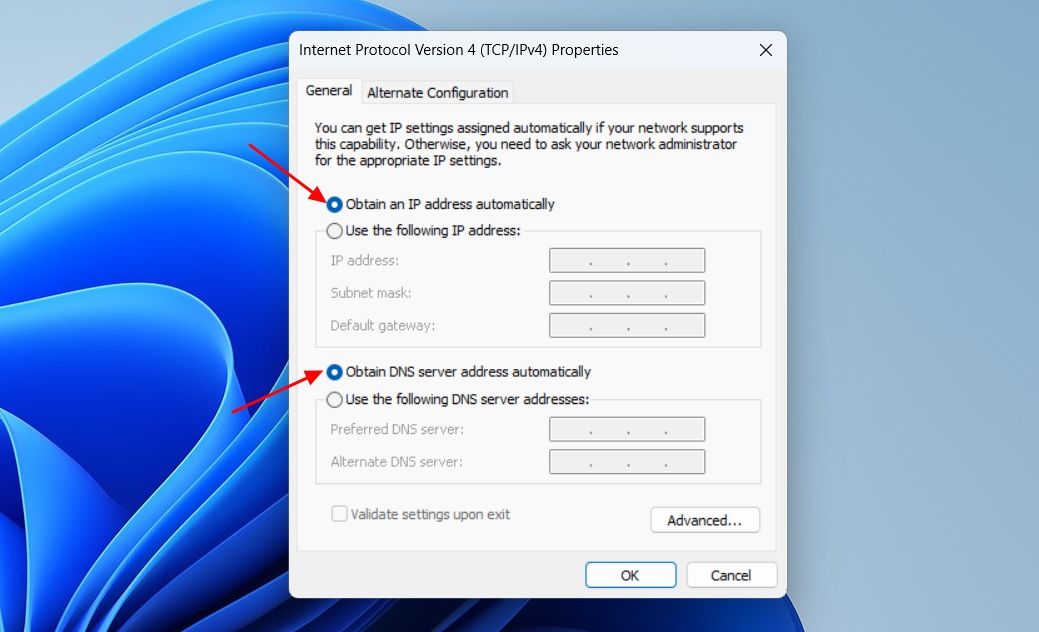
Double-click “Internet Protocol Version 4 (TCP/IPv4),” and choose “Obtain an IP address automatically” and “Obtain DNS server address automatically” options. Then, click “OK.”
Click “OK” to close the properties window. After that, restart your computer and then check for the problem.
Reset the Network Settings
If you’re still unable to connect to the Internet and see the message, then it indicates that some change you made to your network settings is causing the problem. If you remember the change after which you started experiencing the issue, you can simply reverse that to fix it.
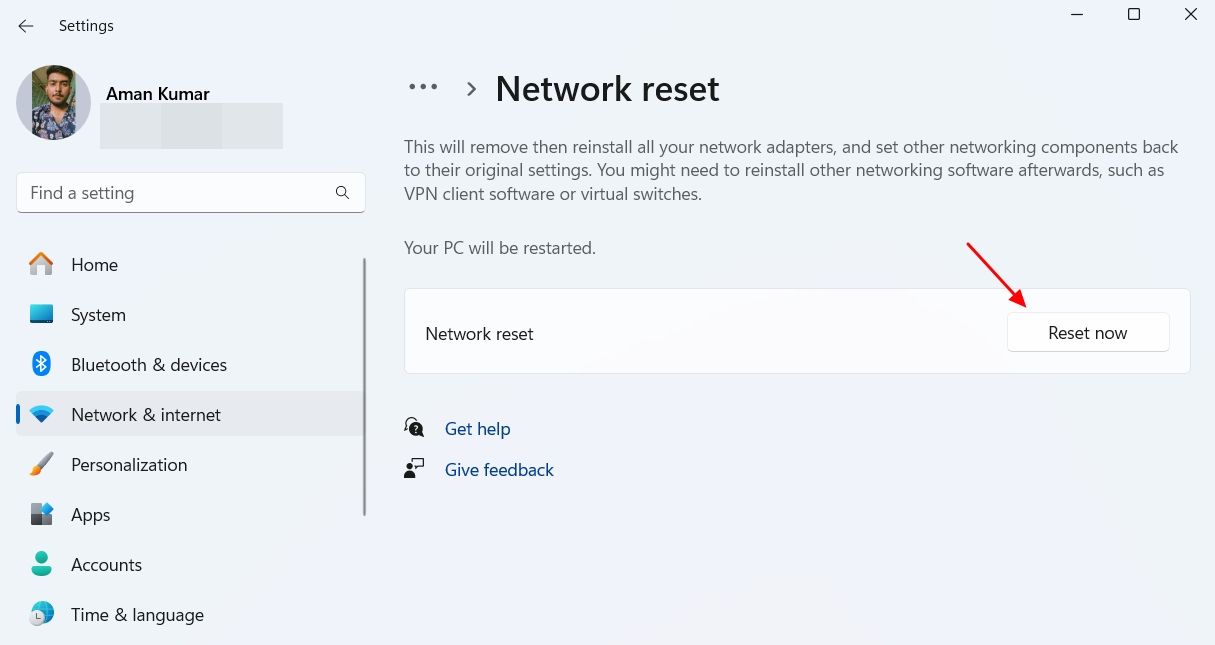
However, if you can’t remember the change, you will have to reset the network settings, which will restore all the network-related changes on your computer to their default values. To reset the network settings on Windows 11, open the Settings menu and navigate to Network & Internet > Advanced Network Settings > Network Reset.
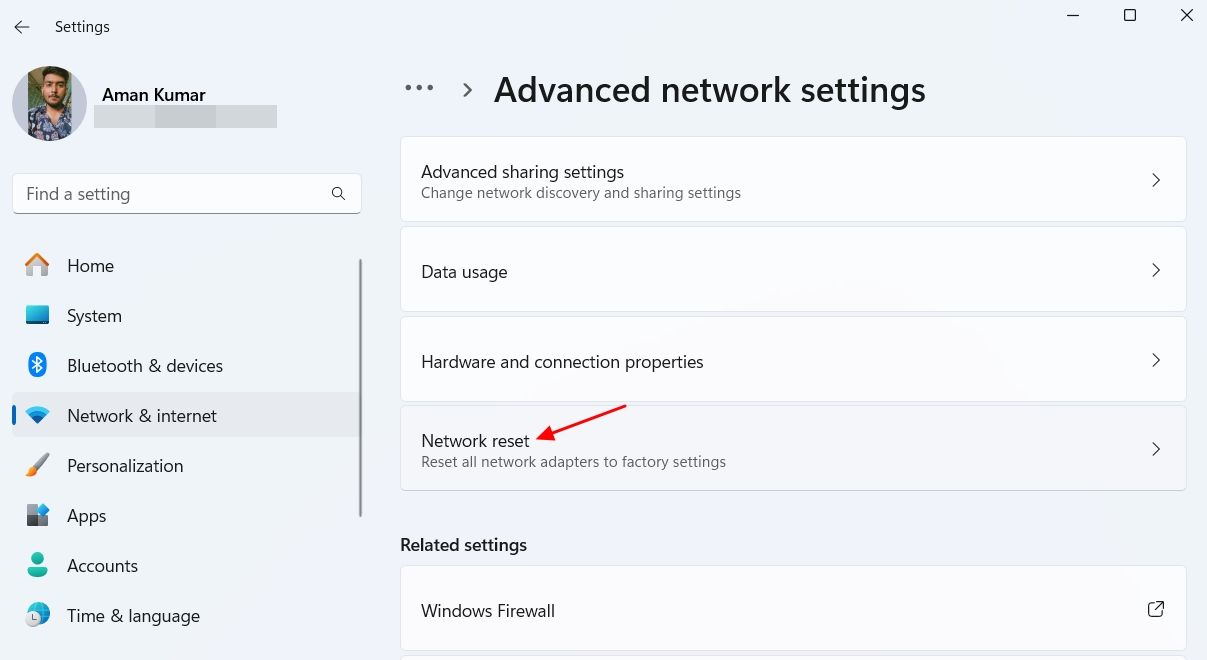
Click the “Reset Now” button and “Yes” to confirm your decision.
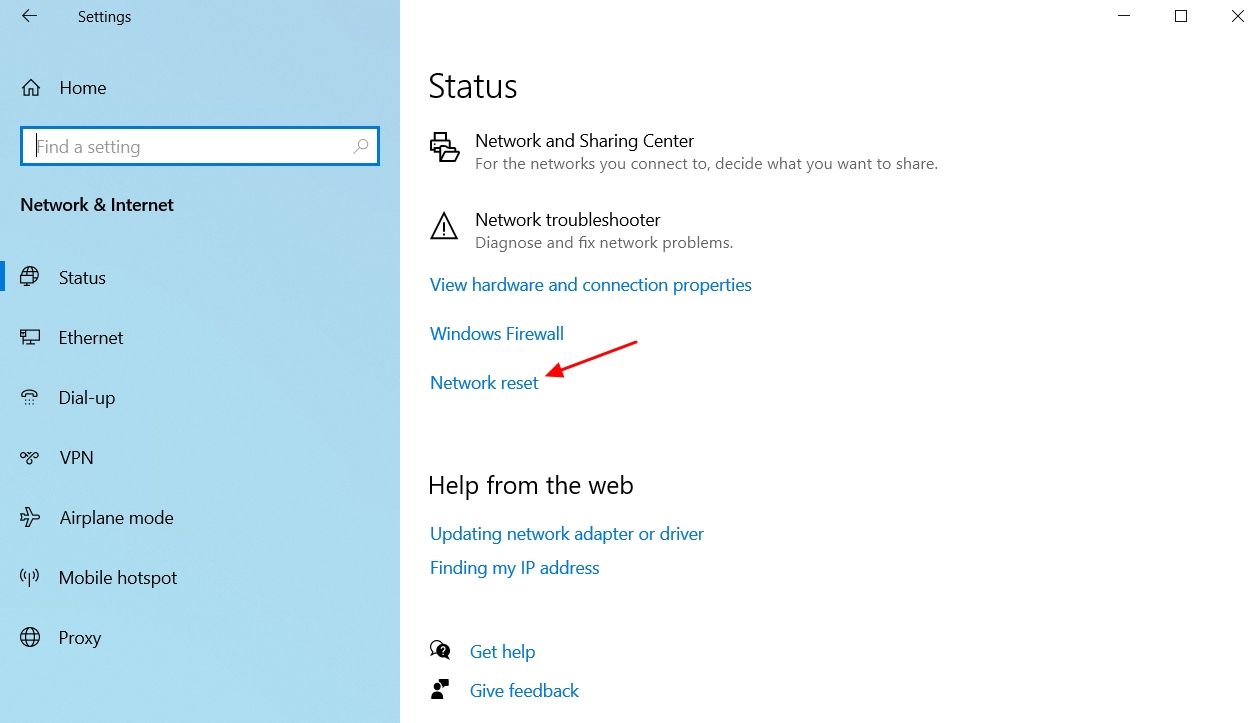
On Windows 10, open the Settings app and go to Network & Internet > Status > Network Reset.
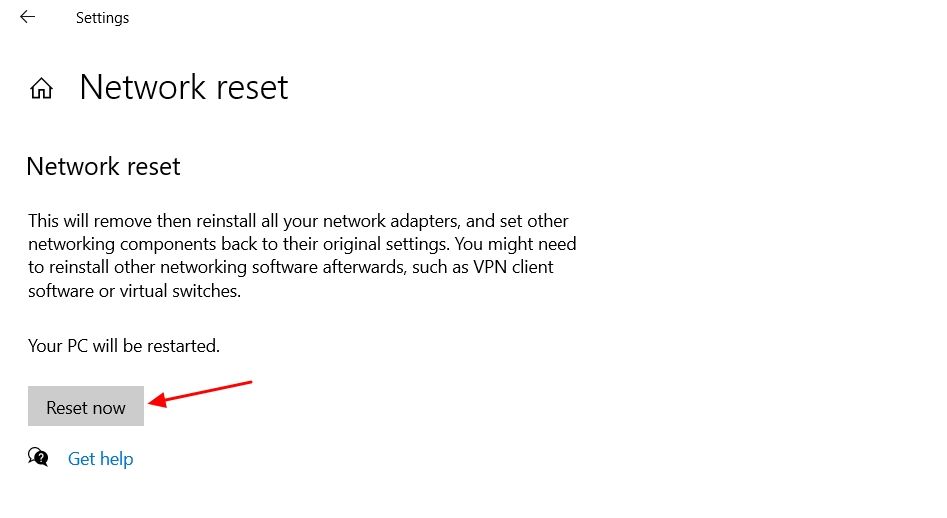
Click “Reset Now” and then click “Yes” to confirm your decision.
Once the reset process is complete, restart your computer, and then you should no longer be facing the problem.
It’s frustrating to be unable to connect to the internet, especially in today’s world where most things are online. Hopefully, the above solutions helped eliminate the “No Internet, Secured” message, and you can now connect to the internet.
Also read:
- [New] 2024 Approved Quick-Load Techniques to Enhance TikTok Videography
- [New] In 2024, Easier Ways to Document Your YouTube Videos
- [Updated] 2024 Approved Maintain Anonymity in FB Narratives
- [Updated] Editor's Expert Analysis VidEdit Pro – A 2023 Overview
- [Updated] Ranking the Best Non-Sportful Activities at First Row
- Create a Stunning Light Sweep Effect in Filmora. Use Simple and Easy Steps to Export a High-Quality Video that Will Impress Even Pro Video Editors for 2024
- Determining Data in Gigabytes for 24-Hour Clip for 2024
- Expert Advice: Clearing Out Memory Dump Files in Windows 11 Easily
- Exploring Leading Social Sites - Facebook, Twitter, Instagram, and YouTube
- Exploring The Variances Between Standard Hulu and Its Plus Version
- How to Overcome 'Unable to Run Files in Temp Directory' And Complete Initialization Successfully
- How To Reclaim Space By Forcefully Removing Directories on Windows 10 & 11 with Revo Software
- Revo Uninstaller Pro 5: Revolutionizing the Way You Remove Applications!
- The Powerhouse Quadruplets of Social Media: Unveiling Facebook, Twitter, Instagram & YouTube Strategies
- The Powerhouse Trio of Social Networking: Unveiling the Secrets Behind Facebook, Twitter, Instagram, & Youtube
- The Top Social Media Platforms: Facebook, Twitter, Instagram & YouTube
- Top 10 Firefox Video Capture Packages for 2024
- Understanding the Titans of Online Sharing: Facebook | Twitter | Instagram | YouTube
- Unofficial Guide: Setting Up Windows 11 on Incompatible Processors
- Title: Step-by-Step Tutorial: Troubleshooting & Solving Secure Internet Connectivity Problems on Windows PCs
- Author: Michael
- Created at : 2024-09-26 16:15:01
- Updated at : 2024-10-01 16:30:47
- Link: https://win-forum.techidaily.com/step-by-step-tutorial-troubleshooting-and-solving-secure-internet-connectivity-problems-on-windows-pcs/
- License: This work is licensed under CC BY-NC-SA 4.0.