
Mastering Multi-Row Insertion Techniques in Microsoft Excel – A Comprehensive Guide

Mastering Multi-Row Insertion Techniques in Microsoft Excel – A Comprehensive Guide
Quick Links
- Table of Contents
- Insert Multiple Rows in Excel With a Right-Click Menu Option
- Insert Multiple Rows in Excel With a Keyboard Shortcut
Inserting multiple rows into your Microsoft Excel spreadsheet isn’t difficult. Simply use a quick context menu option or a keyboard shortcut to add several rows at once. We’ll show you how to do just that.
Related: How to Quickly Add Rows and Columns to a Table in Microsoft Word
Table of Contents
- Insert Multiple Rows in Excel With a Right-Click Menu Option
- Insert Multiple Rows in Excel With a Keyboard Shortcut
Insert Multiple Rows in Excel With a Right-Click Menu Option
One way to add multiple rows in Excel is by using an option in Excel’s context menu.
To use this method, first, open your spreadsheet with Microsoft Excel.
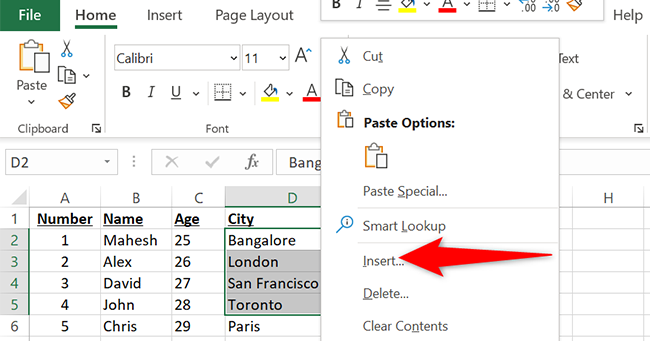
In your spreadsheet, select the number of rows that you’d like to add. For example, if you want to add four new rows, select four rows in your spreadsheet above which the new rows will be added.

Right-click one of the selected rows, and from the menu that opens, select “Insert.”
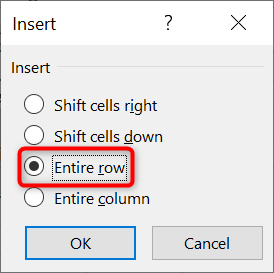
You will see a small “Insert” box on your screen. In this box, enable the “Entire Row” option and click “OK.”
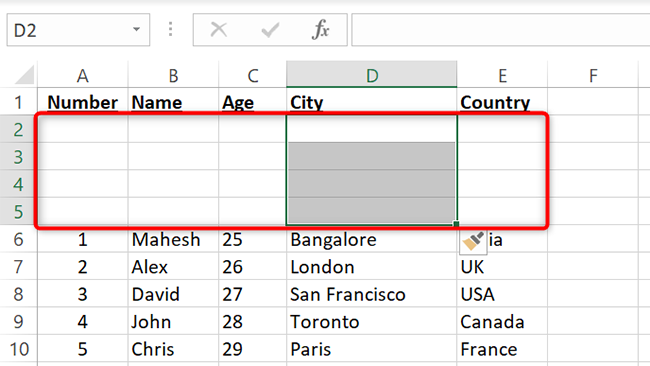
And instantly, Excel will add the specified number of rows to your spreadsheet.
To quickly remove the newly added rows, press Ctrl+Z on PC or Command+Z on a Mac.
You’re all set.
Insert Multiple Rows in Excel With a Keyboard Shortcut
If you prefer using Excel keyboard shortcuts , there’s a shortcut you can use to quickly add multiple rows to your Excel spreadsheet.
Related: All the Best Microsoft Excel Keyboard Shortcuts
To use the shortcut, first, open your spreadsheet with Microsoft Excel.
In the spreadsheet, select the number of rows you’d like to add. For example, if you want to add three new rows, select three rows in your current spreadsheet. Excel will add new rows above the selected rows.

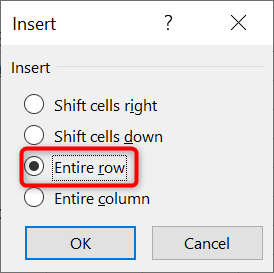
While the rows are selected, press Ctrl+Shift+Plus (+ sign) at the same time on a PC, or Command+Shift+Plus (+ sign) on a Mac. This will open an “Insert” box. In this box, choose “Entire Row” and click “OK.”
Excel will add the selected number of rows to your spreadsheet.

And that’s how you make room for new data in your spreadsheets by adding multiple rows at once. Very useful!
If you often work with tables, you can add and remove columns and rows in a table in Excel just as easily.
Related: How to Add or Delete Columns and Rows in a Table in Microsoft Excel
Also read:
- [New] Unlocking Full-Screen Recording Features in Mi 11
- [Updated] Altering Who Can Access Your YouTube Videos
- [Updated] HoloLens Review – Unleashing Virtual Potential with Microsoft
- [Updated] Sharpen Your Streams Top 5 Video Enhancers
- Connect and Engage on Leading Platforms: Facebook, Tweeter, Graffiti, TubeYou
- Easy Guide: Updating Device Drivers on Windows 11 with Step-by-Step Instructions
- Easy Steps for Cancelling Send on Outlook - A Comprehensive Guide
- Expert Techniques for Permanently Deleting Files in Windows 11 Using Revo Uninstaller
- Find the Current PowerShell Version in Windows 10 with Ease – Expert Tips & Tricks
- In 2024, Top 5 from Infinix Hot 40 to iPhone Contacts Transfer Apps and Software | Dr.fone
- In 2024, Top-Rated HD Video Editing Tools for Professionals and Beginners
- Mastering File Management in Windows 11: Remove Directories via Command Line
- Remove Google FRP lock on Motorola
- Top Platforms in Digital Networking - Facebook, Twitter, Instagram, Youtube
- Unleashing Digital Potential with Leading Platforms: Facebook, Twitter, Instagram and YouTube
- Title: Mastering Multi-Row Insertion Techniques in Microsoft Excel – A Comprehensive Guide
- Author: Michael
- Created at : 2024-09-24 16:26:45
- Updated at : 2024-10-01 16:16:53
- Link: https://win-forum.techidaily.com/mastering-multi-row-insertion-techniques-in-microsoft-excel-a-comprehensive-guide/
- License: This work is licensed under CC BY-NC-SA 4.0.