
Mastering Excel: A Comprehensive Guide to Step-by-Step Formula Analysis

Mastering Excel: A Comprehensive Guide to Step-by-Step Formula Analysis
Quick Links
If you’re collaborating on a spreadsheet, you may want to break down a formula someone entered. While many times this easy, there are others where the formula is more complicated. Excel provides a tool to evaluate formulas step-by-step.
For nested or lengthy formulas, you can see how they work one step at a time from the inside out. This not only helps you to understand the formula and its arguments but can also assist you in troubleshooting formula errors.
As of May 2022, the feature is available on Windows with Excel for Microsoft 365, Excel 2019, Excel 2016, Excel 2013, Excel 2010, and Excel 2007.
Use the Evaluate Formula Tool in Excel
Open your Excel sheet and select the cell containing the formula you want to evaluate. Go to the Formulas tab and choose “Evaluate Formula” in the Formula Auditing section of the ribbon.

You’ll see your formula placed in the center box. Click “Evaluate” to begin. The tool evaluates the formula from the inside out, so you’ll first notice it explaining the underlined portion.
Let’s walk through our nested formula example:
`=IF(SUM(A1:A5)>20,AVERAGE(A1:A5),"No")`
. This formula says, if the sum of cells A1 through A5 is greater than 20, average the cells in A1 through A5, otherwise, display “No.”

When you click “Evaluate,” the underlined part of the formula shows the result . In our formula, it sums the cells A1 through A5 and sees if the result is greater than 20.
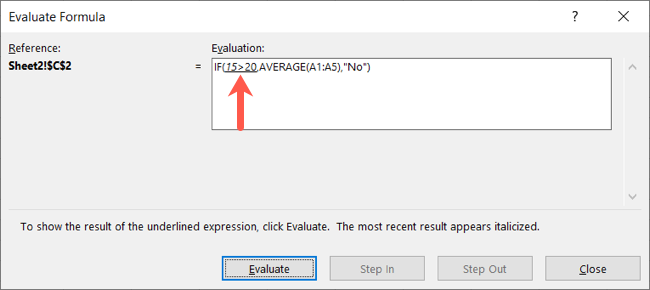
Then when you click “Evaluate” again, the next underlined portion is evaluated and shows the result. For us, the result is False because the sum is not greater than 20.
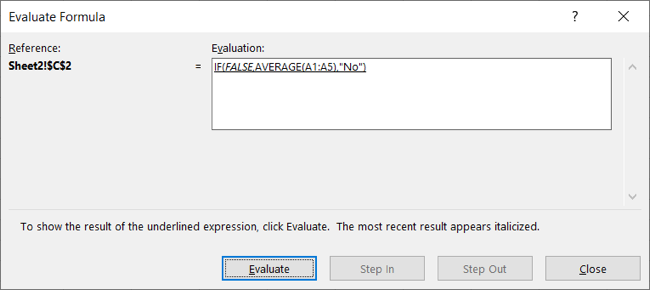
When you reach the end, you’ll see the final result that displays in your cell. For our formula this is “No” because the IF function’s formula displays the if-not-then result.
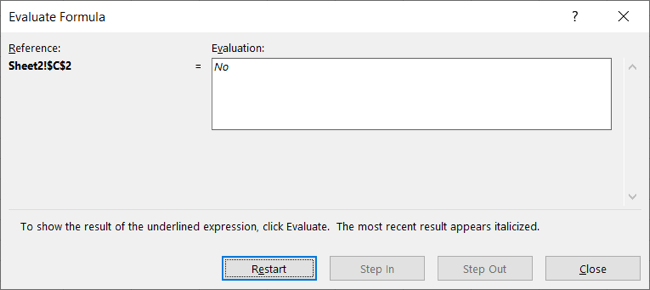
You can then select “Restart” to see the step-by-step evaluation again or “Close” to exit the tool.
Let’s look at another example where you can use the Step In and Step Out features of the tool. For this we’ll use a basic IF function formula rather than a nested formula:
`=IF(A1=5,"Yes","No")`
. This says, if the value in cell A1 equals 5, display “Yes,” otherwise, display “No.”
Here we see our formula with the underlined portion and the Step In button available.
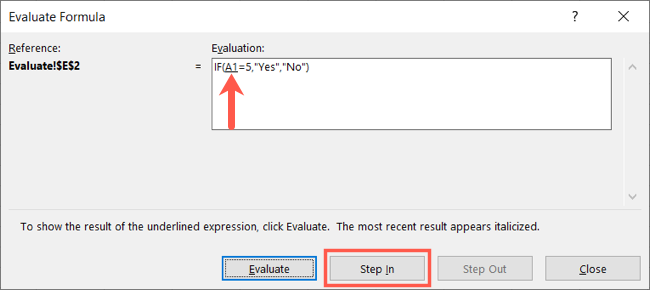
Click that button to display the constant for the formula. It will appear in its own box. You can see here it’s 1 because that’s the value in cell A1.
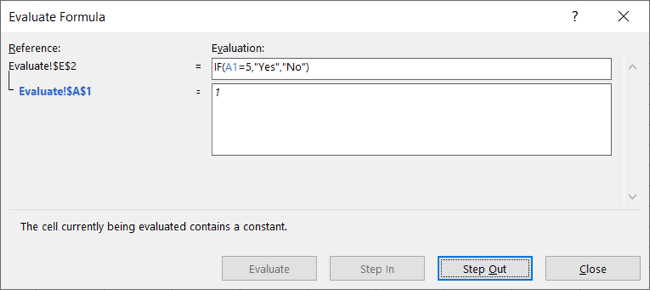
You can then click “Step Out” to close that box and continue with “Evaluate” to work through the formula. The next step evaluates if 1 is equal to 5, per our formula.

Click “Evaluate” to see that the result is False, 1 is not equal to 5.

Therefore, the formula’s result is “No.”
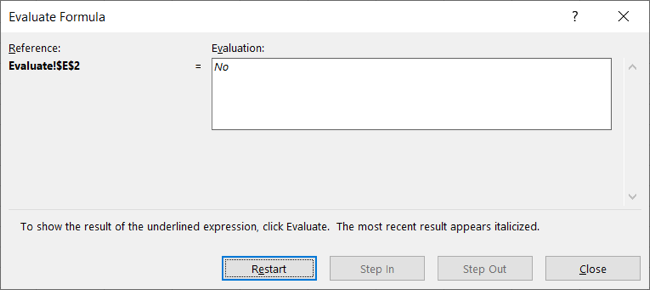
When you see a formula that you’re trying to understand, the Evaluate Formula feature in Excel can help. For more, look at these basic Excel functions .
Also read:
- [New] 2024 Approved Blending Beats Posting Tunes on Digital Diaries
- [New] Exclusive Top 10 Mobile Photography Tools for Superior Slo-Mo Effects
- 2024 Approved Android&iOS The Best FREE Overlay Imaging Tools (Top 10)
- 2024 Approved Maximizing Your Viewing Experience Top 10 iOS Video Apps
- 高速ビデオから低速にシフト:60fps動画を30fpsにどうする?
- Expert Analysis: Microsoft Surface Pro with Copilot - Stunning Design Meets Mixed AI Performance
- How to Use Revo Uninstaller to Manage Startup Programs on Your PC
- Master the Cleanup: Disabling Web Trackers on Windows 10 and Android Phones
- Mastering Online Interaction with Leading Networks: Facebook, Twitter, Instagram & YouTube
- Revolutionizing Your Home Screen: How RevoUninstaller Helps Tidy Up Android Apps
- Step-by-Step Tutorial on Driver Updates for Windows 11 Using Revo Uninstaller
- The Best-Selling VR Gaming Experienences on Oculus
- The Quintessential Quartet for Online Engagement: Twitter, Instagram, Facebook & YouTube
- Understanding the Top Four Social Networking Giants: Facebook, Twitter, Instagram and Youtube
- Unveiling the Advancements in Apple Watch Series 4: Greatness Redefined and Refined
- Title: Mastering Excel: A Comprehensive Guide to Step-by-Step Formula Analysis
- Author: Michael
- Created at : 2024-09-27 16:01:14
- Updated at : 2024-10-01 17:30:04
- Link: https://win-forum.techidaily.com/mastering-excel-a-comprehensive-guide-to-step-by-step-formula-analysis/
- License: This work is licensed under CC BY-NC-SA 4.0.