
Diagnosing and Fixing Maximum CPU Usage Due to Disk Activity on Windows 11
Unlocking Social Media Secrets: Strategies for Maximizing Impact on Facebook, Twitter, Instagram, and YouTube
How to fix 100% disk usage on Windows 10
How to fix 100% disk usage on Windows 10 ](https://store.revouninstaller.com/order/checkout.php?PRODS=28010250&QTY=1&AFFILIATE=108875&CART=1 )
If your computer is slow and your Windows 10 Task Manager shows 100% disk usage, that means that there is an issue that is causing your hard drive to over-work. Read on to learn how you can fix the 100% disk usage in Windows 10.
What are the reasons behind 100% disk usage in Windows 10
The easiest way to discover what is causing the 100% disk usage is to go to the Windows Task Manager. You will see which process is overloading your system and which issue you need to fix.
To open the Task Manager:
- HitCTRL + SHIFT + ESC
- Click on the Processes Tab
- Arrange the Disk column to show the processes with the highest disk usage.
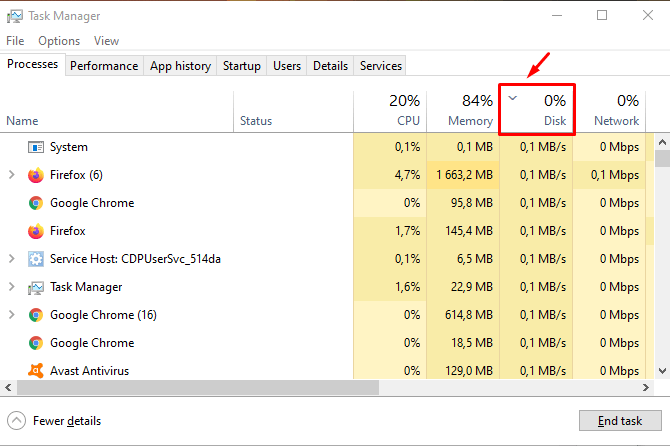
If there are items that are utilizing more than 1 to 2 MB per second is a concern. The performance of your system can be harmed even if there is slightly higher disk usage.
Once you’ve checked your Task Manager and there are some issues, you can see how you can solve them below
Method 1: Close applications that are running in the background
If there are a lot of background applications that are running may cause 100% disk usage in Windows 10. You canuninstall some of the ones that you are not using, but most of the time you can stop them from running.
When you open the Windows Task Manager and see which process is the reason behind the 100% usage, do the following:
- Select the process/program that you wish to stop running.
- Click “End Task” at the bottom of the window
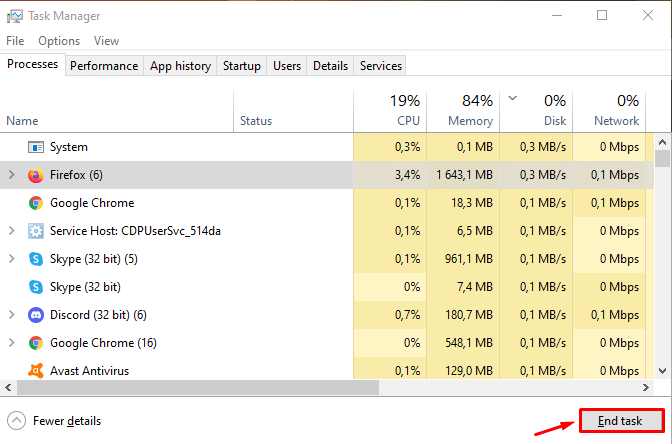
This will force stop the software or the process that is causing the 100% disk usage and should improve the performance of your system.
Method 2: Update Windows 10
Updating your Windows 10 to its latest version can many times solve problems of unknown nature. You can check if your Windows is up to date by:
- Go to PC Settings
 - Click on “Update & Security settings”
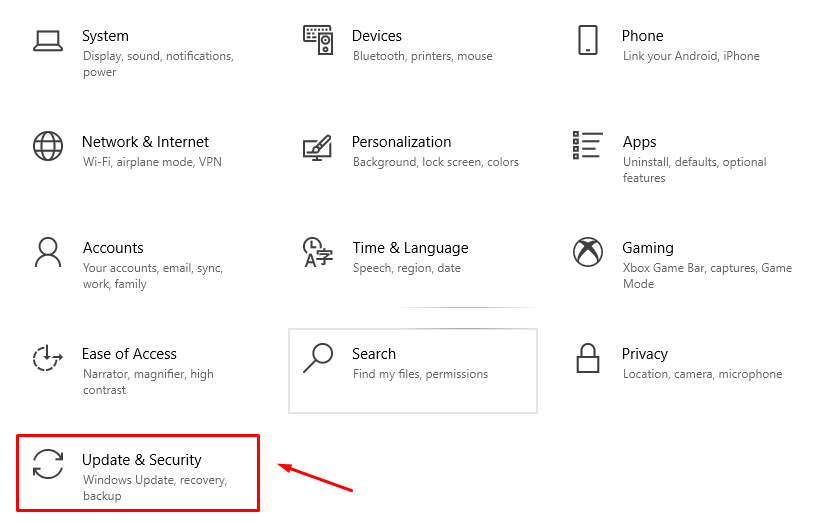
3. Navigate to “Windows Update”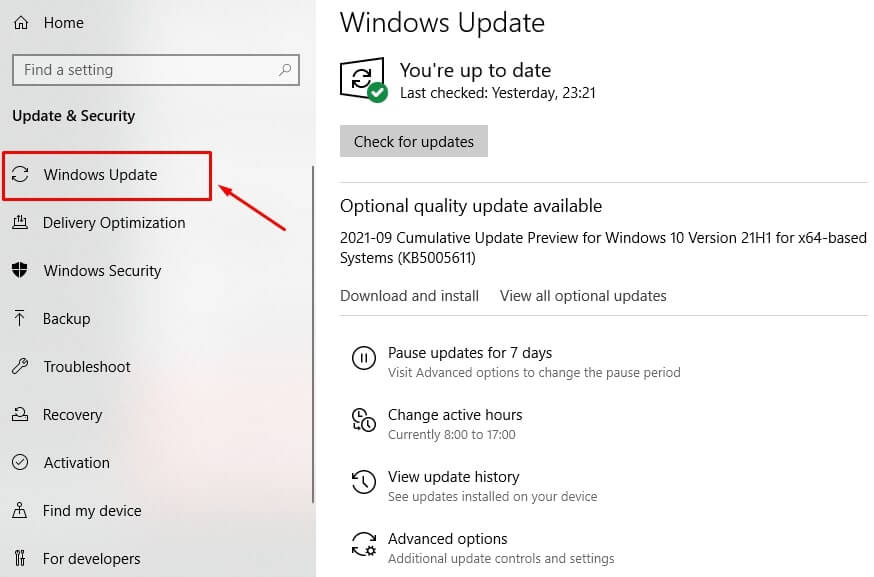
By updating your system you can improve the overall performance including that of your hard drive.
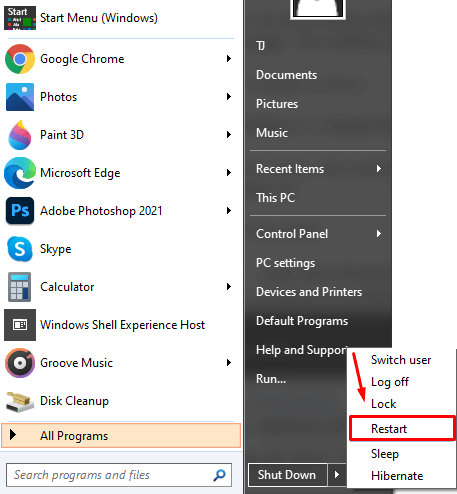
Method 3: Restart Your Computer
This is an all-knowing method for resolving some of the Windows 10 issues, including 100% disk usage. This method may not point you to the reason behind your issue, but it can fix it.
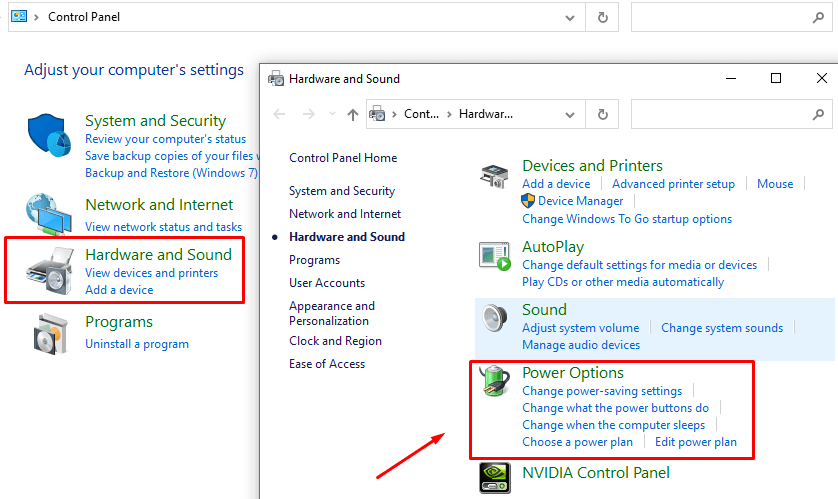
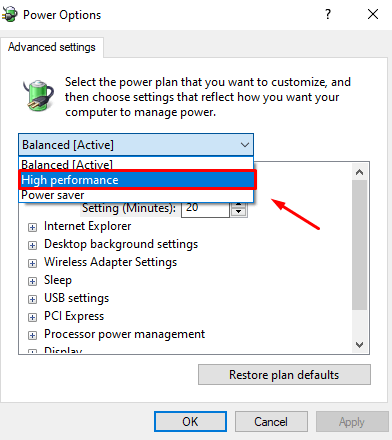
Method 4: Change the Energy Options
In some cases, this method helps some of the users to fix their 100% disk usage problem in Windows 10.
- Open and Windows Start Menu and click on Control Panel
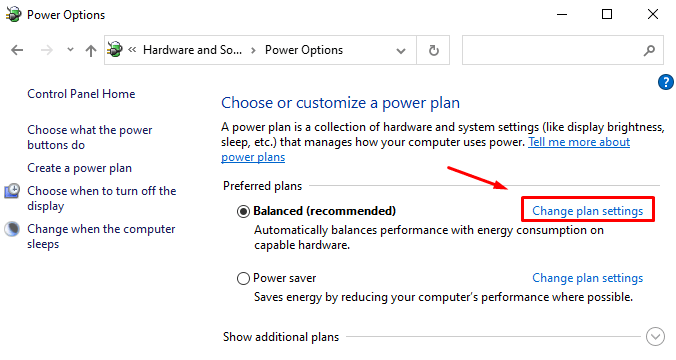
- Go to Hardware and Sound -> Power Options
 - Click on Change Plan settings
 - Click on “Change advanced power settings”
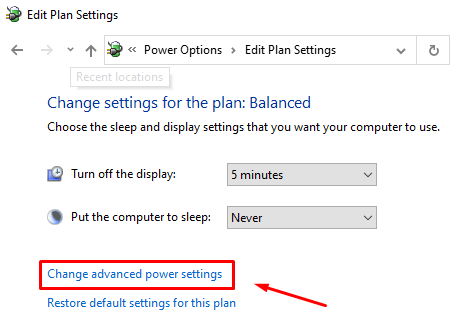 - Select the “High-performance” option from the drop-down menu
Method 5: Reset Virtual Memory in Windows 10
Virtual memory is using your disk as if is RAM, by swapping temporary files when it runs out of actual RAM. Errors can start showing up in the_pagefile.sys_ and it can cause 100% disk usage on your Windows 10 computer.
To solve this issue you will have to reset your virtual memory settings:
- Open the Windows Start Menu and click on “PC Settings”
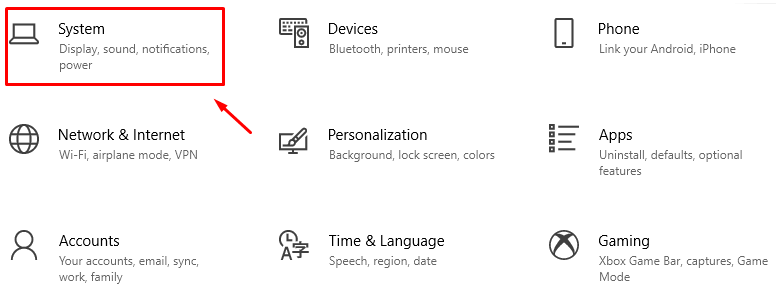
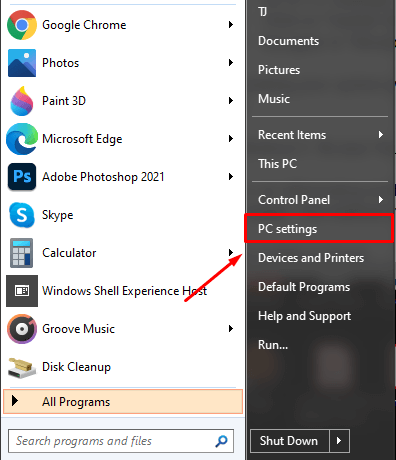 - Click on “System”
3. Navigate to the “About” menu and click on “Advanced system settings”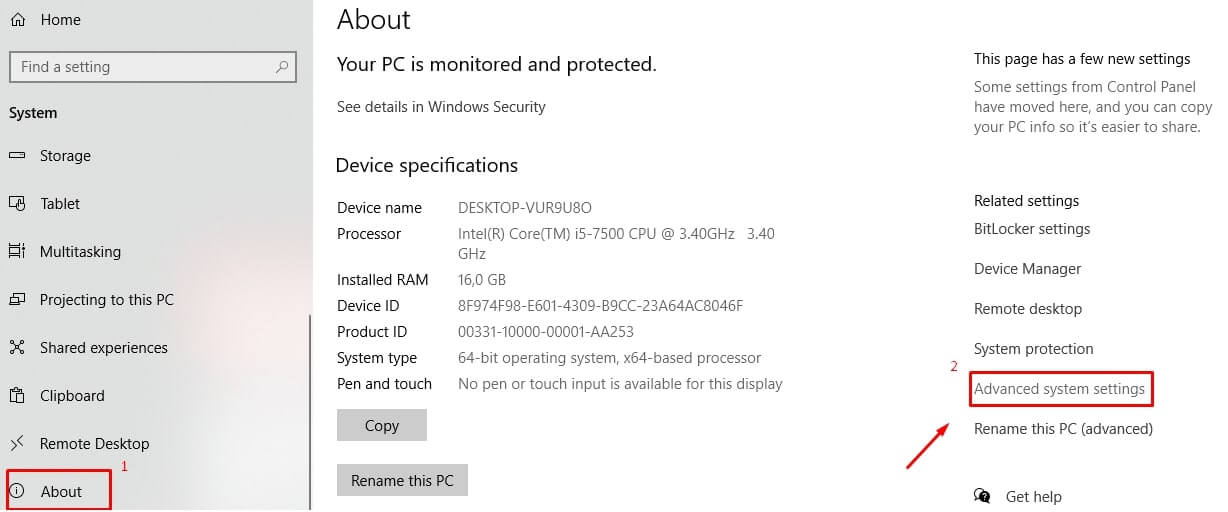
4. In the “System Properties“ window click on the “Advanced” tab and click the “Settings” button in the “Performance” section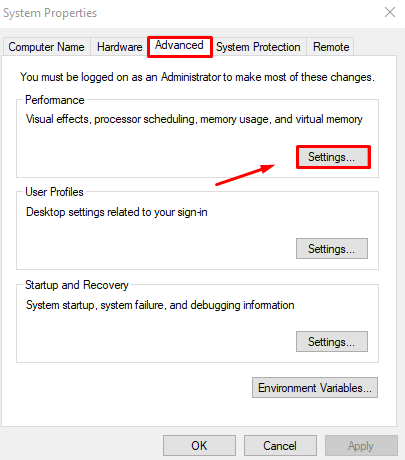
5. Navigate to the “Advanced” tab and click on “Change”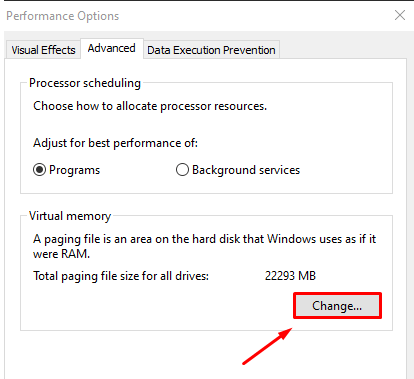
6. Make sure the box titled “Automatically manage paging file size” is checked. Press OK and then reboot. By doing this your system will inhibit the use of virtual memory and may improve your disk performance.
Method 6: Reset or reinstall synchronization tools
Tools like OneDrive or Dropbox sometimes take a lot of resources to synchronize all files. In some cases they get stuck and they overload your hard drive and push the disk usage to 100%. This problem happens when they are still trying to synchronize files after the process is done.
To reset OneDrive for example you can do the following:
- PressWindows Key + R
- Enter the command
%localappdata%\Microsoft\OneDrive\onedrive.exe /reset
This should fix the issue and your disk usage should go back to normal.
Method 7: Rebuild the Windows Search index
Windows Search helps you find files, folders, or anything on your hard drive. To do that it scans your hard drive and turns into a super-fast index to show you your desired results.
In some cases, the search feature can create issues as it keeps on indexing that can cause 100% disk usage and harm your hard drives’ performance.
To solve this problem you can rebuild the index:
- Click on the Windows “Start Menu” button and in the search bar type –
indexing
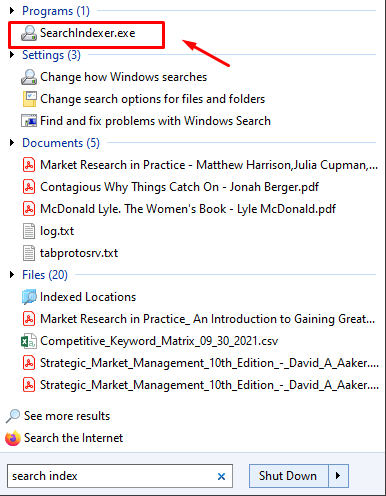 - Select “Indexing Options” in the search results. Click on “Advanced” and hit the “Rebuild” button.

This will erase and rebuilt the index and fix the errors that are behind the 100% disk usage in Windows 10
Method 8: Run Disk Check
Windows 10 Disk Check can identify and automatically correct file system errors which can be harming your hard drives’ performance.
Follow the steps to initiate a Disk Check:
- PressWindows Key + R , type “cmd” in the Run windows, and hitOK
- Type in the following command in the Command Prompt window –
chkdsk.exe /f /r - HitEnter and type Y to confirm the Disk Check the next time you reboot your PC. The Disk Check will start the next time your system start to boot and sometimes it can take quite a while to complete.
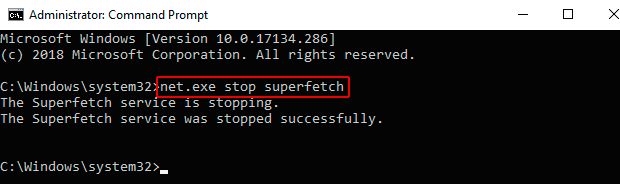
Method 9: Stop the Superfetch Service
Sometimes this service can cause problems and increase the usage of your hard drive.
Similar to the previous step open again the Command prompt. Type the command:net.exe stop superfetch .
Method 10: Disable Windows Search
There is a bug in Windows 8 and Windows 10 that can cause a search loop when you are using Windows Search. This can cause 100% disk usage and a drop in performance.
To disable the Windows Search follow these steps:
- Open the Command Prompt(as mentioned in Method 8)

- Enter the command net.exe stop “Windows search”
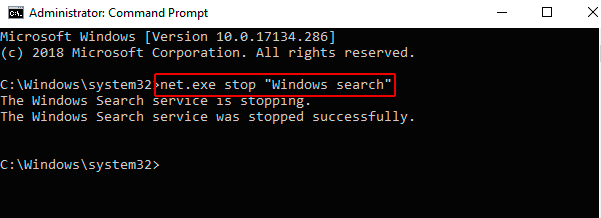
This will temporarily stop Window search from running until the next time Windows is restarted.
If you discover that Windows search is the reason behind your Windows 10 reaching 100% disk usage, you can disable it permanently by doing the following:
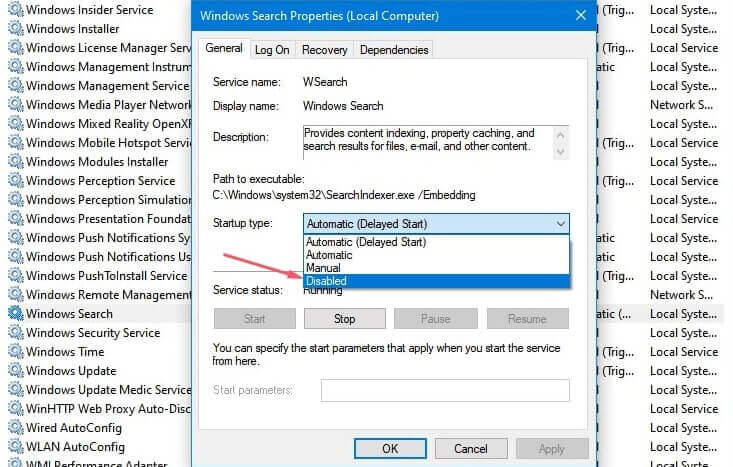
- PressWindows Key + R . Type
service.mscand hitEnter - In the Service window select Windows Search entry and double-click it to update its properties.
- SelectDisable under Startup type and then clickOK .
Method 11: Remove temporary files
Deleting your temporary files as we have covered in our previous article, can help you prevent issues. In some rare cases, bugs with temporary files can cause a Windows process or application to create a lot of files and increase your disk usage to 100%.
Deleting the temporary files is a solution you need to look into to fix the problem.
So what if the 100% disk usage in Windows 10 issue persists?
If you can’t solve your 100% disk usage with the above methods, that means that you probably have to replace your hard drive. Your hard drive should never be at 100% usage. In case it is constantly showing this number there is some reason for the condition. If you don’t address the issue you are risking having a very slow computer.
![]()
We can help you every time when…
- you cannot find the program in the Apps & Features list
- the program’s built-in uninstaller is non-functional
- you have a lot of leftovers slowing down your computer’s performance
- you want to batch uninstall
- many more things
Download now
Also read:
- [New] Streamed Screen Recorder Providers
- [New] The Ultimate List of PS2 Games for iOS Emulation for 2024
- [Updated] In 2024, Harness the Power of GoPro Studio Essential Editing Techniques
- Comparatif In-Depth: WinX DVD Ripper Contre Handbrake - Lequel Est Le Meilleur Echeclibrateur Vidéo Libre?
- Overcoming Freezing Problem During Red Dead Redemption 2 Launch Phase
- Strategies to Bypass ChatGPT's Input Limits
- Understanding Social Platform Leaders: Facebook, Twitter, Instagram & Youtube Breakdown
- Unlocking Social Media Secrets: Strategies for Maximizing Impact on Facebook, Twitter, Instagram, and YouTube.
- Wake Up Your Computer From Afar: Activating Wake-on-LAN in Modern Windows 11 Environments
- Windows 11 Upgrade Troubles? Here's How You Can Install It on Non-Compatible Processors
- Title: Diagnosing and Fixing Maximum CPU Usage Due to Disk Activity on Windows 11
- Author: Michael
- Created at : 2024-10-28 17:27:09
- Updated at : 2024-11-04 22:09:25
- Link: https://win-forum.techidaily.com/diagnosing-and-fixing-maximum-cpu-usage-due-to-disk-activity-on-windows-11/
- License: This work is licensed under CC BY-NC-SA 4.0.